I did some digging and found an alternative solution quite easily. It’s called certbot. It helps us generate wildcard certificates issued by Let’s Encrypt for our Windows servers in a matter of minutes. The following instructions will guide you through the whole process.

Step 1: Install certbot for Windows
- Download it from https://dl.eff.org/certbot-beta-installer-win32.exe / https://certbot.eff.org/instructions?ws=other&os=windows
- The installation will make certbot accessible via the command line
Step 2: Install openssl (to convert the .pemcertificates to .pfx format)
- Download it from https://slproweb.com/products/Win32OpenSSL.html (use the “non-light” version)
- Put it in your system Path so it’s accessible via the command line (https://stackoverflow.com/questions/4822400/register-an-exe-so-you-can-run-it-from-any-command-line-in-windows)
Step 3: Generate the wildcard certificate using certbot
- Open an elevated command line (with administrator privileges) and run:
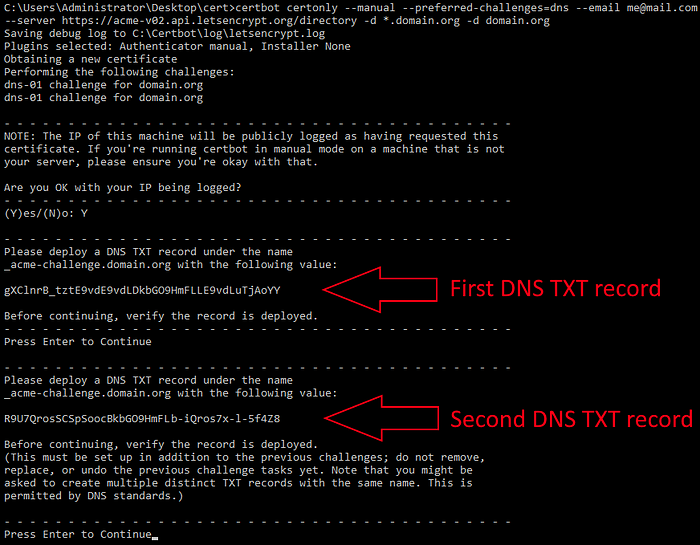
C:\...\cert> certbot certonly --manual --preferred-challenges=dns --email me@mail.com --server https://acme-v02.api.letsencrypt.org/directory -d *.domain.org -d domain.org- Provide your own email after the
--emailparam and domain name after the two-dflags. For the sake of this tutorial, we will be using the domain “domain.org” and its subdomains “*.domain.org”. Please note that we want the certificate to be issued to cover all subdomains and also the domain itself, so we need to specify two values here (one with the asterisk and one without). - Agree to all terms and questions (Yes/Agree)

- Certbot will show you two DNS TXT records (based on how many domains you gave it) which you must deploy under the
_acme-challengesubdomain in order to verify the ownership of your domain. This is usually achieved using a management system of your domain hosting provider in the DNS configuration.

_acme-challenge TXT DNS records via the web UI of your hosting provider- It might take some time (based on the TXT record time-to-tive — TTL) before the TXT records are fully propagated after saving. If you can, make sure you set the shortest possible TTL for these TXT records.
- To check the availability of the TXT records and verify them, you can use the
nslookupcommand in a separate command line window (or a web service like mxtoolbox.com) and make sure the two active TXT records are exactly the same as the ones displayed in the first command line by certbot. The order of these TXT records is not important.
C:\Users\Admin> nslookup -type=txt _acme-challenge.domain.org
- After that, press Enter in the first command line to continue. If the verification was successful. Your certificates will be generated a put in the installation directory of certbot. By default, it’s located in
C:\Certbot\live\domain.org\
Step 4: Convert the certificates from .pem to .pfx and import it
- In that folder, you will find a bunch of
.pemfiles, which must be converted and combined into one.pfxfile before importing to IIS. To do so, use the following commands:
C:\Certbot\live\domain.org> type fullchain.pem privkey.pem > bundle.pem
C:\Certbot\live\domain.org> openssl pkcs12 -export -out "certificate_combined.pfx" -inkey "privkey.pem" -in "cert.pem" -certfile bundle.pem- Provide a password when prompted by openssl.
- Use the
.pfxfile to import the certificate to your system and bind it to your website in IIS.
And that’s all.
BROTIP: The commands in the command line can be partly automated using the following batch script (just replace the domain value at the beginning with your domain):
set dm=domain.orgcertbot certonly --manual --preferred-challenges=dns --email me@mail.com --server https://acme-v02.api.letsencrypt.org/directory -d *.%dm% -d %dm%cd C:\Certbot\live\%dm%type fullchain.pem privkey.pem > bundle.pemopenssl pkcs12 -export -out "certificate_combined.pfx" -inkey "privkey.pem" -in "cert.pem" -certfile bundle.pem
certificate_combined.pfx
Was this article helpful?
That’s Great!
Thank you for your feedback
Sorry! We couldn't be helpful
Thank you for your feedback
Feedback sent
We appreciate your effort and will try to fix the article